|
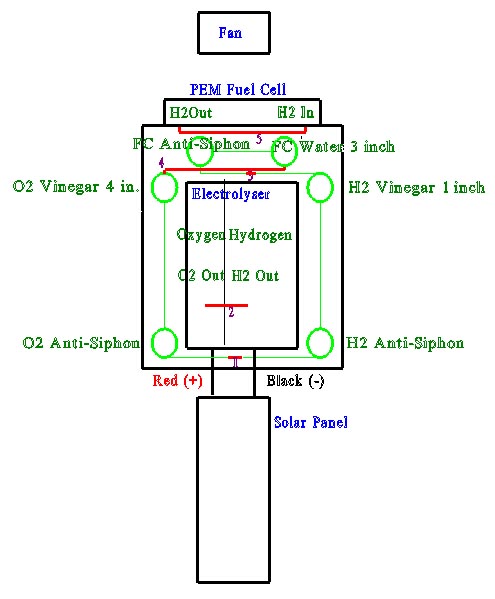
The Basic Kit is shipped so that it requires minimal assembly. The only tool needed is a 5/32 allen wrench, or a pair of pliers. The numbers refer to jumpers and hardline tubing (shown in red) installed so that the kit can be shipped assembled.
1. Remove hard tubing connecting Tygon tubing together.
2. Remove Tygon tubing.
2a. Hook Tygon tubing to electrolyser. H2 Anti-Siphon to H2 side hose barb on electrolyser and the O2 Anti-Siphon to to the O2 side of the electrolyser.
3. Remove hard tubing connecting Tygon tubes together.
3a. DO NOT LET ANY LIQUID GET INTO FUEL CELL.
If there is any liquid in the line remove it before hooking it up to the fuel cell.
4. Remove Tygon jumper from the the O2 Vinegar test tube and the FC Water test tube. The oxygen from the electrolyser and the hydrogen after the fuel cell are vented to the air.
5. Remove Tygon jumper between H2 In and H2 Out on the fuel cell. Hook the fuel cell to the mounting base.
5a. Hook vinegar H2 Vinegar test tube to H2 In on the fuel cell.
5b. Hook the FC Anti-Siphon to the H2 Out on the fuel cell.
Connect the solar panel to the electrolyser, red to oxygen, black to hydrogen.
Hook the fan to the PEM fuel cell.
Look at the Basic Kit layout to check your setup. Go to the Quick Operating Instructions to get your kit going. |